
How to install a roof-mounted RV solar kit, step by step
Plan the layout and wire route first, mount panels to solid structure, seal every penetration with sealant compatible with your roof, keep the controller close to the battery, fuse everything, and follow the controller's connection order.
Recommended tools & parts for this job

Solar
Rigid roof-mount solar panel kit (panels, mounts, controller)
The most durable option for roof installs. Plan your system first.
Check price on Amazon.caSolar
Solar panel Z-brackets or mounting feet
Secure panels with a gap underneath for cooling.
Check price on Amazon.ca
Solar
Roof cable entry gland
Gets solar cables through the roof without leaks. Seal with the right lap sealant.
Check price on Amazon.ca
Roof, seals & sealants
Self-leveling RV lap sealant (Dicor-style, match your roof type)
For horizontal roof seams, vents and fixtures.
Check price on Amazon.ca
Solar
Solar extension cable (MC4 ends)
UV-rated PV wire from panels to the roof entry.
Check price on Amazon.caSolar
MC4 connector kit and spanner
Connects and disconnects solar panel wiring safely.
Check price on Amazon.ca
Solar
MPPT solar charge controller
Converts higher panel voltage into charging current. The best choice for series strings and cold, bright days.
Check price on Amazon.ca
Batteries & inverters
DC circuit breaker (solar/battery)
A resettable disconnect between panels, controller and battery.
Check price on Amazon.ca
Batteries & inverters
ANL or Class-T fuse and holder
Main battery protection. Size to your inverter and cable per the manual.
Check price on Amazon.ca
Electrical & testing
Ratcheting crimper with heat-shrink connectors
Makes reliable, weather-sealed 12V repairs.
Check price on Amazon.ca
Electrical & testing
Digital multimeter (auto-ranging, with DC amps)
The single most useful RV diagnostic tool: checks battery voltage, fuses, switches, continuity and 120V outlets.
Check price on Amazon.caAs an Amazon Associate I earn from qualifying purchases. Always confirm part numbers and sizes against your RV or appliance model before ordering. See all recommended RV tools & parts →
Before you start
This guide assumes you've already sized your system (Planning an RV solar system for Alberta: energy audit, panels, batteries and controller) and chosen a wiring layout (Wiring RV solar panels in series, parallel or series-parallel). Read every manual that came with your kit. Where this guide and your manual differ, follow the manual.
Safety: Roof work is a fall hazard. Use a sturdy ladder, confirm with your RV manufacturer that the roof is walkable (and where), and never work on a wet, frosty or windy roof. Solar panels produce voltage whenever light hits them. Keep panels covered with an opaque blanket or cardboard while you wire, and never connect or disconnect MC4 connectors under load. Batteries can deliver enough current to weld tools and start fires. Remove rings and watches, and use insulated tools.
What you'll need
- Solar kit: panels, mounts, MC4 cables and charge controller
- Roof cable entry gland and self-leveling lap sealant compatible with your roof membrane
- UV-rated PV wire long enough for your route
- A DC breaker or disconnect for the PV input and a fuse or breaker on the controller output
- Cable, lugs and a ratcheting crimper sized for your currents
- A multimeter, drill, sealant scraper and cleaning supplies for the roof
Step 1: Plan the layout
- Measure the roof and mark the A/C, vents, antenna, skylights and the paths you need for walking and maintenance.
- Place panels where they won't be shaded by the A/C or other equipment. Even partial shade on one panel can cut output a lot, especially in series strings.
- Leave room around panels to reach and reseal other roof fixtures later.
- Decide where the cable comes into the RV. Common choices are the fridge vent (if the manufacturer allows it), a cabinet near the battery, or an existing plumbing vent area. Never route cables through a propane appliance's combustion or exhaust path.
Step 2: Confirm what you're screwing into
RV roofs vary: rubber (EPDM), TPO, fibreglass or aluminium over wood or laminated foam. Screws need solid backing such as roof rafters or plywood decking. Your RV manufacturer may publish rafter locations or approved mounting methods. Some kits use VHB adhesive tape in addition to or instead of screws. Use the method the panel kit and RV manufacturer approve.
Step 3: Mount the panels
- Clean the roof where mounts will sit, using a cleaner safe for your membrane.
- Attach mounts (Z-brackets or feet) to the panels on the ground first.
- Lift the panels onto the roof safely. Get a helper.
- Position each panel, mark the mount holes and pre-drill as the instructions say.
- Bed each mount in sealant or butyl if specified, then fasten it.
- Cover every screw head and mount edge with lap sealant, feathering the edges.
Leave an air gap under the panels. Panels produce less power when hot, and the gap also helps snow and water shed.
Step 4: Wire the panels on the roof
Connect the panels in series, parallel or series-parallel according to your plan, using MC4 connectors (or branch connectors and a combiner where needed). Keep the panels covered while you work.

Secure cables with UV-rated clips or ties so they can't flap or rub on the roof. Leave a drip loop before the cable entry.
Step 5: Install the roof cable entry
- Drill the hole for the gland, staying clear of framing and wiring below.
- Feed the cables through, mount the gland in sealant, and fasten it.
- Cover the flange edges and screw heads with lap sealant.
Alberta: Hail and big temperature swings are hard on roof sealant. Inspect the panel mounts and cable entry with the rest of your roof every spring and fall. RV roof maintenance and resealing: a practical inspection and resealing routine covers what to look for.
Step 6: Mount the charge controller near the battery
Mount the controller on a non-flammable surface in a ventilated spot, as close to the battery as practical. The controller-to-battery cable carries the full charging current, so a short run keeps voltage drop low. Follow the manual's clearance and mounting-orientation requirements. Don't mount it inside a sealed compartment with flooded lead-acid batteries, since they can vent explosive gas.
Step 7: Add protection
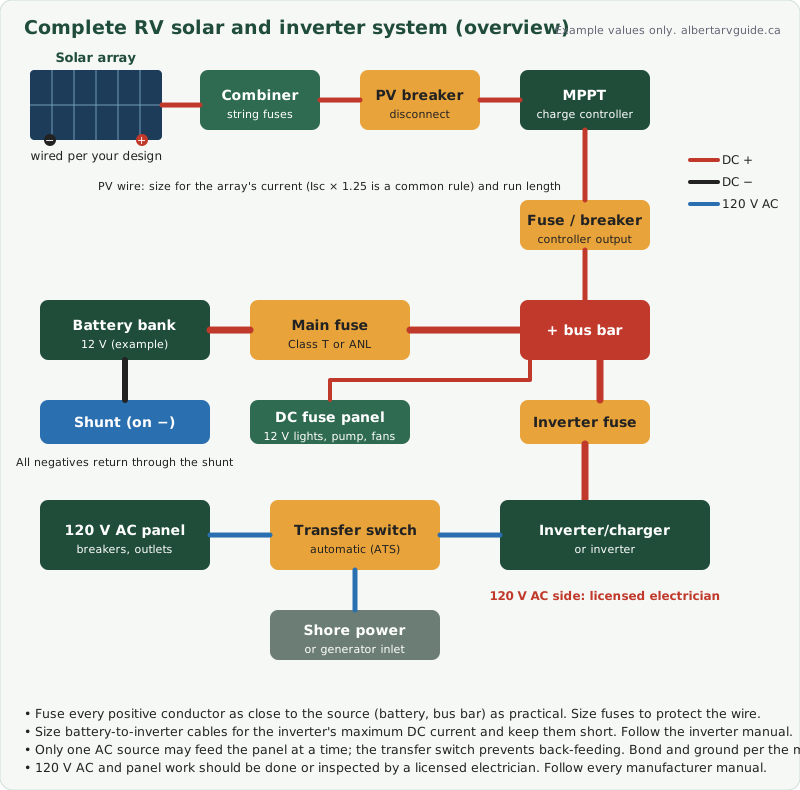
- A DC breaker or disconnect between the array and controller lets you isolate the panels safely.
- A fuse or breaker on the controller's battery side, close to the battery or bus bar, sized per the controller manual and the wire.
- Fuses on parallel strings where required (see Wiring RV solar panels in series, parallel or series-parallel).
Details are in RV solar and battery fusing, breakers, grounding and safety.
Step 8: Connect in the right order
Most charge controller manuals say to connect the battery first, then the solar array, so the controller can detect system voltage. Disconnect in the reverse order: array first, then battery. Check your manual and follow its order exactly.
- With all breakers off and fuses out, connect the controller to the battery (through its fuse or breaker).
- Close the battery-side fuse or breaker. The controller should power up.
- Set the battery type and charging profile.
- Uncover the panels, measure PV voltage at the controller input with a multimeter and confirm the polarity is correct.
- Close the PV breaker.
Step 9: Test and commission
- In good sun, confirm that the controller shows PV voltage, charging current and charging stage.
- Check that all connections are tight and cool to the touch after an hour of charging.
- Watch the battery monitor over a few days to confirm the system keeps up with your usage.
- Label breakers and fuses.
When to call a pro
Get help if you're not sure about roof structure, if you need to tie into an existing converter, alternator or lithium system, or if any part of the project touches the 120V AC system. That should be done by a licensed electrician.
Related guides
How-to videos


Videos are made by third-party creators and load from youtube-nocookie.com only when you press play. Models differ, so always follow your own manuals and the safety notes on this page.
Disclaimer: This guide is general information based on common RV designs. Models differ, so check your owner's manual and appliance manuals. Propane, 120V electrical and brake systems can cause serious injury if handled incorrectly. If you are unsure, stop and book a certified RV technician.