
RV solar and battery fusing, breakers, grounding and safety
Fuses protect wire. Put one on every positive conductor near its power source, size it to the wire and the equipment manual, use DC-rated parts, ground at a single point, and keep a fire extinguisher close.
Recommended tools & parts for this job

Batteries & inverters
ANL or Class-T fuse and holder
Main battery protection. Size to your inverter and cable per the manual.
Check price on Amazon.ca
Batteries & inverters
DC circuit breaker (solar/battery)
A resettable disconnect between panels, controller and battery.
Check price on Amazon.ca
Solar
Solar combiner box
Combines parallel strings with fuses or breakers per string.
Check price on Amazon.ca
Batteries & inverters
Positive and negative bus bars
A tidy, safe way to land multiple DC connections.
Check price on Amazon.caElectrical & testing
Battery lug and ring terminal kit
For battery, shunt and bus bar connections. Match the stud size and wire gauge.
Check price on Amazon.ca
Electrical & testing
Ratcheting crimper with heat-shrink connectors
Makes reliable, weather-sealed 12V repairs.
Check price on Amazon.ca
Batteries & inverters
Smart battery shunt (Bluetooth)
Measures every amp in and out so you know real state of charge, not just voltage.
Check price on Amazon.ca
Safety & detectors
ABC fire extinguisher
Keep one near the door and check the gauge regularly.
Check price on Amazon.ca
Safety & detectors
Safety glasses
For drilling, grinding, sealant work and under-chassis jobs.
Check price on Amazon.caAs an Amazon Associate I earn from qualifying purchases. Always confirm part numbers and sizes against your RV or appliance model before ordering. See all recommended RV tools & parts →
The rule that matters most: fuses protect wire
A fuse or breaker exists to stop a wire from overheating if there's a short or overload. Size it so it opens before the wire it protects gets too hot. It should also be within any maximum the equipment manual specifies.
Place the fuse as close as practical to the power source. On battery circuits that's the battery or bus bar. On PV circuits it's where the strings combine.
Safety: Batteries, especially lithium banks, can deliver enormous current into a short circuit. That can melt tools, start fires and cause burns. Remove jewellery, use insulated tools, keep a fire extinguisher nearby, wear safety glasses, and disconnect the battery negative before working. Solar panels produce voltage in daylight, so cover them before working on PV wiring.
Where protection goes
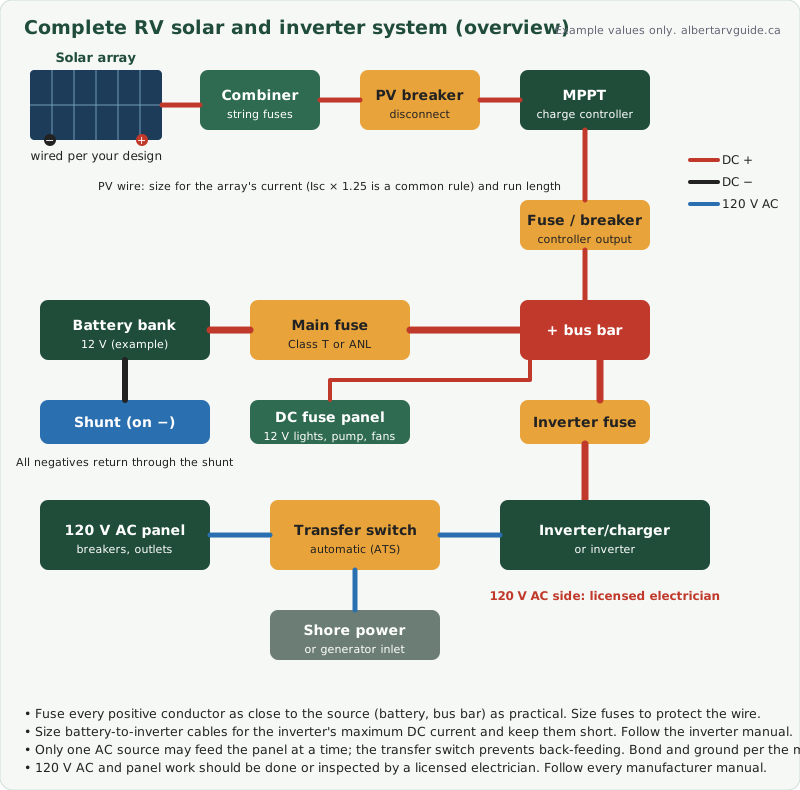
| Location | What to use | Size from |
|---|---|---|
| Each PV string (3+ strings in parallel) | String fuses in a combiner box | Panel maximum series fuse rating |
| Array to controller | DC breaker or disconnect, PV-rated | Array current and voltage; controller manual |
| Controller to battery/bus bar | Fuse or DC breaker near the battery end | Controller max output current and wire |
| Battery positive (main) | Class T or ANL fuse, close to the battery | Inverter manual and cable |
| Inverter feed | Fuse per inverter manual | Inverter max DC current |
| 12V distribution | Blade fuses in the DC panel | Each circuit's wire |
| Negatives | Through the shunt to a negative bus bar | Shunt rating |
Use DC-rated parts
DC arcs are harder to extinguish than AC arcs. Use fuses and breakers rated for DC at your system voltage. PV circuits may run at much higher voltage than the battery, so PV breakers and fuses must be rated for the array's cold-weather voltage (see Wiring RV solar panels in series, parallel or series-parallel).
Class T vs ANL
Both protect main battery cables. Class T fuses have a very high interrupt rating, meaning they can safely stop very large fault currents. For that reason they're widely recommended for lithium banks and large inverters. ANL fuses are common and inexpensive, with a lower interrupt rating. Follow your battery and inverter manuals.
Grounding and bonding
- Connect the DC negative system to the RV chassis at one point, usually through a dedicated ground cable from the negative bus bar or shunt load side, as the equipment manuals specify.
- Connect the inverter's chassis ground lug to the chassis.
- Bond solar panel frames and mounts if the panel or controller manual requires it.
- AC grounding and neutral-ground bonding belong to the 120V system. Leave those to a licensed electrician (Installing an RV inverter and automatic transfer switch).
Good connections prevent fires
- Use lugs sized for both the wire and the stud, crimped with the right tool.
- Torque terminals to the manufacturer's spec, and re-check after the first few trips (vibration loosens things).
- Don't stack too many lugs on one battery post. Use a bus bar.
- Protect cables from chafing where they pass through metal or framing, and support them so they don't hang on terminals.
- Label everything.
Lithium-specific notes
- The battery's built-in BMS can disconnect it during faults or cold. Make sure your chargers and controller handle a sudden disconnect, and that alternator charging is suitable for lithium. A DC-DC charger is the usual solution.
- Most LiFePO4 batteries can't be charged below freezing without heating. Choose chargers and controllers with low-temperature cut-off, or self-heating batteries.
Annual safety check
When to call a pro
If you find signs of overheating, aren't sure about fuse sizing, or are adding a large lithium bank or inverter, have a qualified RV electrical technician review the system. Any 120V AC work should be done by a licensed electrician.
Related guides
How-to videos


Videos are made by third-party creators and load from youtube-nocookie.com only when you press play. Models differ, so always follow your own manuals and the safety notes on this page.
Disclaimer: This guide is general information based on common RV designs. Models differ, so check your owner's manual and appliance manuals. Propane, 120V electrical and brake systems can cause serious injury if handled incorrectly. If you are unsure, stop and book a certified RV technician.